At first let me show you how I could
image this editor could look like.
But please don't expect too much, since I'm not very familiar with graphic tools so finally this is just a collage of some screenshots I found.
And also please be patient, because my english skill is limited since it is not my mother tongue ;-)
The main concept:
The concept is based on 3 things:
1. Mainly I like the concept of having layer's, such like in gimp for example, because it's pretty logical IMHO.
So, the lowest video layer (Background - V) always contains the background movie(s) and all layers above will hide the video content below - if not resized.
I think this is logical, since in real life we also can always "see" what is on top and the content below will be hidden.
In the case of audio it seems to be irrelevant how to place this layers, since we always can hear many sound's at the same time - just depending on the sound intensity.
To keep the video-logic I should have to say that video-clips don't overlap, right?
But to prevent to waste the spare desktop-space they should be able to overlap!
2. The other main concept is to be strictly contextive; what I mean is that every action refer on what is actually selected (track(s) , clips, region selected by in and out point, timeline cursor, handles, ....)
3. The third is to avoid mouse usage the classical way.
A dream would become true if the JMB concept would be used to realize that!
http://www.nongnu.org/protux/59.html
When reading this page you will find some examples of how this could be done the classical way.
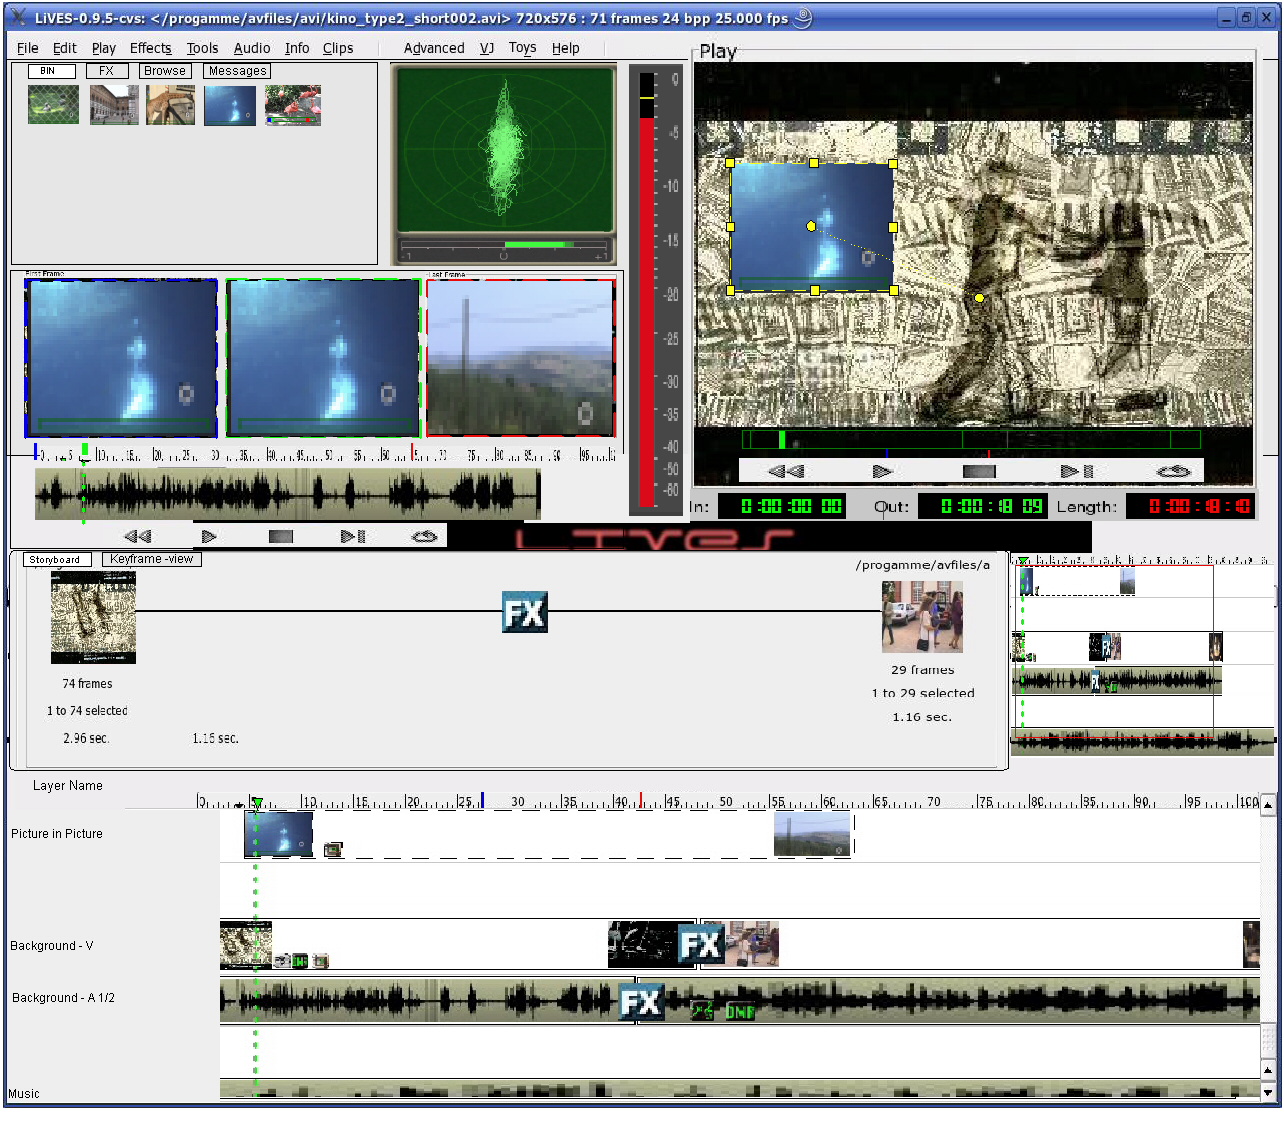
The Interface:
Ok, the interface don't look very innovative, but I think the concept of "how to edit movies" is at least a little bit innovative ;-)
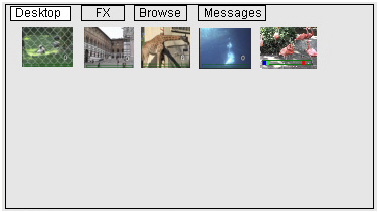
- In the upper left corner is the "Ingredients Pool" where all ingredients (video/audio footage, graphics, fx, ....) are located and user can browse thru the file system or available fx, create bin's to organize the source files a bit more accurate or sorted, .....
The tabs are directly accessible via "D", "F", "B", .....
Ok, here comes the first example of how to avoid mouse usage.
Example 1:
Once the browser is activated - by just hitting the "B" button , for example, the last selected tab/item is still activated. Items will be selected by using the arrows of the number pad and a new tab will be alternativly activated by a shortcut like "TAB + ARROW L/R" which means - Keep the TAB button pressed down and hit the left or right arrow in addition to activate another TAB to the left or right.
(I hope it is possible to make such actions possible, because I really like such mnemonic tricks!!!)
Example 2:
When a media item is selected, it would be fine to be used directly as a "quick preview" - just hit the general playback and navigation shortcuts as used in other editors as well like:
- JKL to control the playback, pause, speed and direction
- the arrows could be used to move by frames and in combination with other control/shift/alt varitions.
- In and Out point can be defined by the "I" and "O" keys
- and so on ....
- Located below of the "Ingredients Pool" is the "Preview/Trim Section" (video and audio if there is any audio):
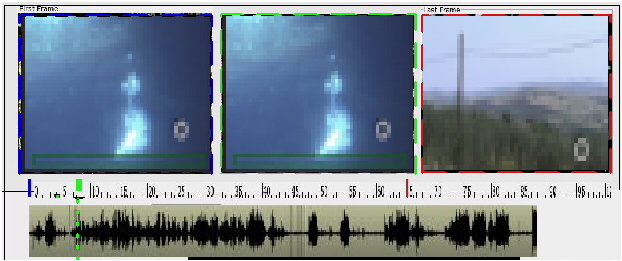
The left thumbnail shows the in point of the selected clip, the thumb on the right shows the out point and the one in the middle shows the actual selected frame in pause mode, or shows the clip when played back.
Below of the thumbs are the audio waveform(s).
Example 3:
To show a more detailed preview, of the selected item, user just have to hit the "P" key to activate the Preview section to afterwards use the standard playback control mechanism (Example 2) again.
- The next section below is the "Storyboard":
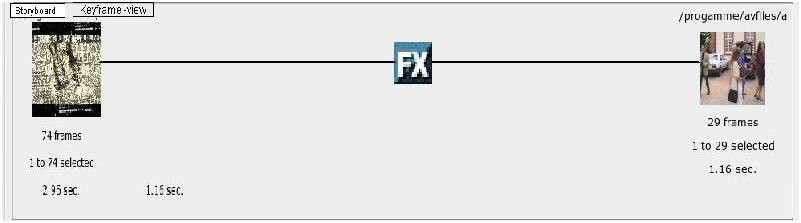
This section shows the media in the background layer only and is assumed to offer a fast way to create a raw shot of the movie.
Example 4:
When a media item is selected - and maybe trimmed as well (Example 2 or Example 3) - user just have to hit "ALT + A" for example, to assemble this media at the beginning of the project - the timeline cursor jumps automatically at the end of this clip. "ALT + A" again with another media item will append this media at the position of the timeline cursor.
Another actions could be:
"ALT + O" to Overwrite new media.
"ALT + I" to Insert media.
"ALT + F" to Fit media into a determined region.
Example 5:
Transition effects can be applied the same way - choose an effect, set In and Out point or just a duration and hit finally a shortcut - the transition will be applied at the nearest edit.
- Next at the buttom of the screenshot is the "Timeline":

The Timeline has 3 contextive levels:
1. When entering the timeline, by "T", all actions will be refer to the timeline cursor.
Examples 6:
- Move the timeline cursor from edit to edit by the arrows on the number pad (or by "E + L/R ARROWS" to avoid usage of the number pad).
- Zoom by "Z + ARROWS U/D/L/R"
- Select a track by "U/D ARROWS"
- Split clip by "S"
- Add a marker by "M"
- Set In/Out points by "I" + "O"
- Activate In/Out points "ALT + I/O" to be moved by arrows.
- Go to In/Out points by "SHIFT + I/O"
- .... and so on ....
2. When hitting "P", to activate the preview, the focus will be passed over to the the clip that is touched by the timeline cursor in regard of the selected track.
Examples 7:
In case of the timeline screenshot above, the clip in the selected "Picture in Picture" layer will be opened in the "Preview/Trim Section" when hitting "P" for further operations.
3. When hitting "C", to activate the canvas, all actions will affect the position on the canvas.
- The "Canvas"
The canvas need to have some modes:
1. Align mode - "A"
2. Scale Mode - "S"
3. Rotate Mode - "R"
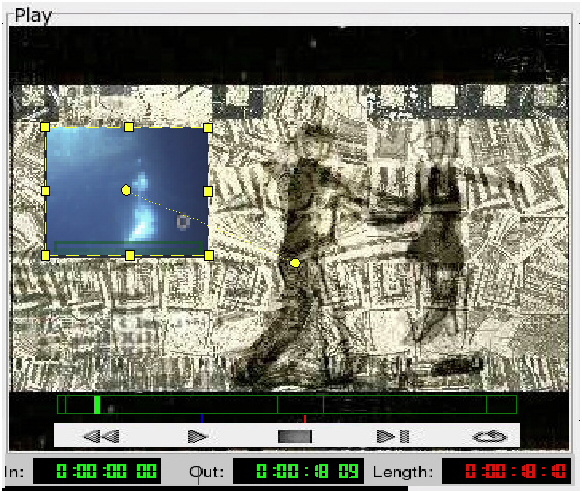
Since the canvas is activated by "C" the clip can be moved around on that by the number pad.
There is a cool connection between the handles on the clip and the numbers on the number pad, because we have 9 handles that could be connected with the numbers on the number pad.
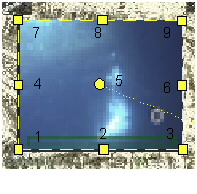
Example 8:
Ok, at first a handle has to be activated which could be done by "ALT + 5" to activate the center handle.
Now the clip can be positioned again via the number pad arrows in any direction:
Hitting the numbers directly move the clip by a small amount and combinations with shift, control, .... can handle bigger amounts.
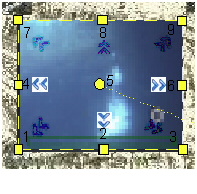
Example 9:
An fast way to allign the clip would be done this way:
Activate the "Align Mode" by "A", then activate handle 5 by "ALT + 5", press "SHIFT + 9" to align the upper right corner of the clip to the upper right corner of the canvas.
Press "SHIFT + 9" again to align the center handle to the upper right corner of the canvas and a final "SHIFT + 9" will align handle 1 to the upper right corner of the canvas.
So to move the clip exactly out of the canvas to the left JUST TWO actions has to be performed, for example - "ALT + 6" and "SHIFT + 4".
Yeah, I really like that stuff !!! ;-)
Scaling the clip by keeping the ratio can be done by activating one of the corner handles in "Scale Mode".
Ok, here I have to agree that this may be a bit complicated at first sight, but I think after a short time of usage it will be possible to work very fast using that concept IMHO.
Please RFC on that!
- The "Overview":
Also nothing new, but very helpful to adopt the zoom factor of the timeline by just drawing a rectangle on that area.
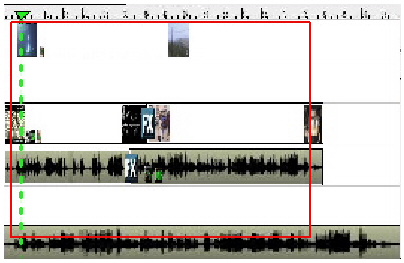
- The "Keyframe Editor":
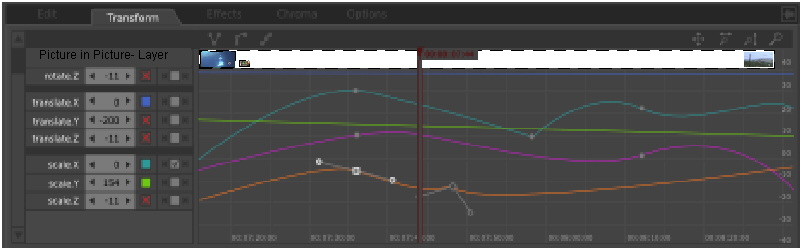
When working on the canvas it makes more sense to change the Storyboard, or the timeline view, into a keyframe view like this.
At least, this is a place where the mouse usage is "maybe" not to avoid, but then it would be a lot more comfortable with JMB ;-)
But, in general, it would be good to give the user the option to arrange all windows he would prefer to have. Also merging windows to be tabbed afterwards should be possible.
Last update: 18. Okt. 2005
But please don't expect too much, since I'm not very familiar with graphic tools so finally this is just a collage of some screenshots I found.
And also please be patient, because my english skill is limited since it is not my mother tongue ;-)
The main concept:
The concept is based on 3 things:
1. Mainly I like the concept of having layer's, such like in gimp for example, because it's pretty logical IMHO.
So, the lowest video layer (Background - V) always contains the background movie(s) and all layers above will hide the video content below - if not resized.
I think this is logical, since in real life we also can always "see" what is on top and the content below will be hidden.
In the case of audio it seems to be irrelevant how to place this layers, since we always can hear many sound's at the same time - just depending on the sound intensity.
To keep the video-logic I should have to say that video-clips don't overlap, right?
But to prevent to waste the spare desktop-space they should be able to overlap!
2. The other main concept is to be strictly contextive; what I mean is that every action refer on what is actually selected (track(s) , clips, region selected by in and out point, timeline cursor, handles, ....)
3. The third is to avoid mouse usage the classical way.
A dream would become true if the JMB concept would be used to realize that!
http://www.nongnu.org/protux/59.html
When reading this page you will find some examples of how this could be done the classical way.
The Interface:
Ok, the interface don't look very innovative, but I think the concept of "how to edit movies" is at least a little bit innovative ;-)
- In the upper left corner is the "Ingredients Pool" where all ingredients (video/audio footage, graphics, fx, ....) are located and user can browse thru the file system or available fx, create bin's to organize the source files a bit more accurate or sorted, .....
The tabs are directly accessible via "D", "F", "B", .....
Ok, here comes the first example of how to avoid mouse usage.
Example 1:
Once the browser is activated - by just hitting the "B" button , for example, the last selected tab/item is still activated. Items will be selected by using the arrows of the number pad and a new tab will be alternativly activated by a shortcut like "TAB + ARROW L/R" which means - Keep the TAB button pressed down and hit the left or right arrow in addition to activate another TAB to the left or right.
(I hope it is possible to make such actions possible, because I really like such mnemonic tricks!!!)
Example 2:
When a media item is selected, it would be fine to be used directly as a "quick preview" - just hit the general playback and navigation shortcuts as used in other editors as well like:
- JKL to control the playback, pause, speed and direction
- the arrows could be used to move by frames and in combination with other control/shift/alt varitions.
- In and Out point can be defined by the "I" and "O" keys
- and so on ....
- Located below of the "Ingredients Pool" is the "Preview/Trim Section" (video and audio if there is any audio):
The left thumbnail shows the in point of the selected clip, the thumb on the right shows the out point and the one in the middle shows the actual selected frame in pause mode, or shows the clip when played back.
Below of the thumbs are the audio waveform(s).
Example 3:
To show a more detailed preview, of the selected item, user just have to hit the "P" key to activate the Preview section to afterwards use the standard playback control mechanism (Example 2) again.
- The next section below is the "Storyboard":
This section shows the media in the background layer only and is assumed to offer a fast way to create a raw shot of the movie.
Example 4:
When a media item is selected - and maybe trimmed as well (Example 2 or Example 3) - user just have to hit "ALT + A" for example, to assemble this media at the beginning of the project - the timeline cursor jumps automatically at the end of this clip. "ALT + A" again with another media item will append this media at the position of the timeline cursor.
Another actions could be:
"ALT + O" to Overwrite new media.
"ALT + I" to Insert media.
"ALT + F" to Fit media into a determined region.
Example 5:
Transition effects can be applied the same way - choose an effect, set In and Out point or just a duration and hit finally a shortcut - the transition will be applied at the nearest edit.
- Next at the buttom of the screenshot is the "Timeline":
The Timeline has 3 contextive levels:
1. When entering the timeline, by "T", all actions will be refer to the timeline cursor.
Examples 6:
- Move the timeline cursor from edit to edit by the arrows on the number pad (or by "E + L/R ARROWS" to avoid usage of the number pad).
- Zoom by "Z + ARROWS U/D/L/R"
- Select a track by "U/D ARROWS"
- Split clip by "S"
- Add a marker by "M"
- Set In/Out points by "I" + "O"
- Activate In/Out points "ALT + I/O" to be moved by arrows.
- Go to In/Out points by "SHIFT + I/O"
- .... and so on ....
2. When hitting "P", to activate the preview, the focus will be passed over to the the clip that is touched by the timeline cursor in regard of the selected track.
Examples 7:
In case of the timeline screenshot above, the clip in the selected "Picture in Picture" layer will be opened in the "Preview/Trim Section" when hitting "P" for further operations.
3. When hitting "C", to activate the canvas, all actions will affect the position on the canvas.
- The "Canvas"
The canvas need to have some modes:
1. Align mode - "A"
2. Scale Mode - "S"
3. Rotate Mode - "R"
Since the canvas is activated by "C" the clip can be moved around on that by the number pad.
There is a cool connection between the handles on the clip and the numbers on the number pad, because we have 9 handles that could be connected with the numbers on the number pad.
Example 8:
Ok, at first a handle has to be activated which could be done by "ALT + 5" to activate the center handle.
Now the clip can be positioned again via the number pad arrows in any direction:
Hitting the numbers directly move the clip by a small amount and combinations with shift, control, .... can handle bigger amounts.
Example 9:
An fast way to allign the clip would be done this way:
Activate the "Align Mode" by "A", then activate handle 5 by "ALT + 5", press "SHIFT + 9" to align the upper right corner of the clip to the upper right corner of the canvas.
Press "SHIFT + 9" again to align the center handle to the upper right corner of the canvas and a final "SHIFT + 9" will align handle 1 to the upper right corner of the canvas.
So to move the clip exactly out of the canvas to the left JUST TWO actions has to be performed, for example - "ALT + 6" and "SHIFT + 4".
Yeah, I really like that stuff !!! ;-)
Scaling the clip by keeping the ratio can be done by activating one of the corner handles in "Scale Mode".
Ok, here I have to agree that this may be a bit complicated at first sight, but I think after a short time of usage it will be possible to work very fast using that concept IMHO.
Please RFC on that!
- The "Overview":
Also nothing new, but very helpful to adopt the zoom factor of the timeline by just drawing a rectangle on that area.
- The "Keyframe Editor":
When working on the canvas it makes more sense to change the Storyboard, or the timeline view, into a keyframe view like this.
At least, this is a place where the mouse usage is "maybe" not to avoid, but then it would be a lot more comfortable with JMB ;-)
But, in general, it would be good to give the user the option to arrange all windows he would prefer to have. Also merging windows to be tabbed afterwards should be possible.
Last update: 18. Okt. 2005